Oona Ellibeans, a little whimsical mohair doll is now available in my Etsy Shop. You can see her here.
Oona is hand dyed and shaded. She has a super big mohair head, a crooked smile, and a ffluffy mohair skirt. Oona sports cotton floss pigtails. her eyes are vintage mother of pearl buttons. Oona has hand dyed wool felt arms that are thread jointed. Her legs are purple hand dyed wool felt. Please come visit her!
Browsing through some doll blogs, I found that doll artist, Esther Verschoor is having a give away for a book on her wonderful dolls. Today is the last day to submit a chance to win a beautiful book by Essie's Dolls, Vanessie by Esther Verschoor.
Essie is a talented doll artist who makes dark art dolls. She is from the Netherlands and is a member of the DABIDA doll organization there. You can find her give-away post here.
While working in the studio today, I started seeing photo compositions of various objects that struck me as funny or just interesting. I ran and got my camera and quickly shot them so I would have a record of the images. Makes me think I'll start taking my camera around more when I go out.
Hangry Dal doll
Teddy w.i.p. - in baggie
Assortment of mohair pieces from mohair gift rolled up to go into supply closet
When I was little, I desperately wanted a Barbie - the original bathing suit, pony-tailed Barbie from 1959. I liked the fact that she didn't look like the typical children's' dolls of the time with toddler-like bodies and faces; she had a mannequin's body, and her face had a sophisticated, almost haughty look. I wanted to be a fashion designer, and I thought she would be wonderful to design clothes for. Unfortunately, my mother wasn't willing to buy me a Barbie because she didn't think her adult appearance was appropriate for a children's doll.
Then, as an adult, I started collecting artist dolls. I used to go to doll and teddy bear shows when they were more plentiful. There I found dealers who specialized in vintage Barbies and people who collected them. I did find some of the original 1959 Barbies but, now they cost about $3000.00 and I couldn't afford one. If I could have looked into the future and seen that I would still want a Barbie when I grew up - I would have really pestered my mom until she gave into me.
I gave up on getting one of the original Barbies, but have recently been ogling the 50 year anniversary Barbies that are reproductions of the first bathing suit Barbies. Maybe I'll finally get my Barbie, after all.
I've always been interested in miniature settings, especially ones that include handmade objects. I found a dollhouse kit, the Buttercup that looked fairly simple and had an open main floor and attic. My daughter and I decided to do the dollhouse project together. It has been a long ongoing project, as we work on it when my daughter has the time available (mainly in the summer).
The pieces of the dollhouse kit are scored into thin wood sheets shaped in the forms of the various walls, roofs, floors, windows, etc. They have to be carefully detached or the wood splinters. We used Aleene's® Quick Dry Tacky Glue to attach the pieces and then used long pieces of masking tape as makeshift clamps to hold the pieces together while they dried. The masking tape worked really well.
The doll house has a bit of a split personality going on as I wanted to try using some natural materials, gravel, shells, twigs and moss and my daughter wants to make a "mad scientist" lab. We're not as concerned about having a strictly cohesive design, but more interested in using the dollhouse as a laboratory for our various ideas.
My daughter is designing the first floor. It will have a kitchen/science lab and a living room. We found a source for miniature glass lab beakers and chemistry items at Ray Storey's website, here. She made floor tiles from card stock that she painted with a marbled design and then glued to the dollhouse floor. She colored the rug (a piece of velvet) with fabric markers in a bright modern design. I'm going to make some twig and shell furniture for the attic which will have a bedroom and bath. This DvD, "Creating Beautiful Fairy Furniture" by Debbie and Mike Shramer, is wonderful for inspiration and technique for twig furniture.
We used tacky glue to add pebbles to the bottom 3 inches of the exterior walls. Then we covered the outside of the house with a grey gravel we found at the hardware store. We put the house on it's side, covered the up-facing wall with glue, and then gently poured gravel over it. We pressed down on the gravel and let it dry. We did this messy work on a table outside on the deck. We had to fill in areas where the gravel didn't stick the first time we applied them. My daughter had planned to use little wooden shingles to cover the roof. But after we did the gravel walls, we decided to use moss because we liked the way the moss looked with the gravel. The moss came in sheets and large pieces so went on pretty quickly.
For the exterior windows, we are gluing on bits of moss and then covering them with small shells from a craft store. We didn't like the decorative plastic pieces for the glass of the windows that came with the kit, so we used them as patterns and cut ours out of clear mylar. The front door will also be moss and shell-covered, and there will be more shell detailing on the roof. We have to do some touch up on the attic walls as we painted them before putting them together. The painting is much easier this way, but the wall joins don't get covered very well. We still have most of the windows to cover with moss bits and shells. We are thinking we will cover the front door with moss and then put shell decoration on it.
We hope to finish our dollhouse next summer (during my daughter's summer break) . Then comes the extra fun part of furnishing it.
A fun read all about dollhouses and miniatures is "The Dollhouse Blog by S. Mehreen" Her July 2008 archives have posts about a Hogwarts castle and two enchanting fairy houses using natural materials. (Update: Sumaiya Mehreen's blog has been changed to"My Dream Dollhouse". You can check it out here.)
Please enjoy this video of exquisite miniature breads, cheese, and deli meats by British artist, Vicky Guile. She makes these miniatures of polymer clay, and the detail is amazing!
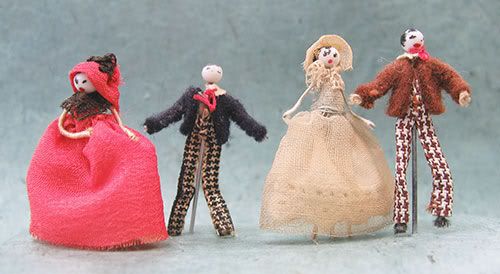
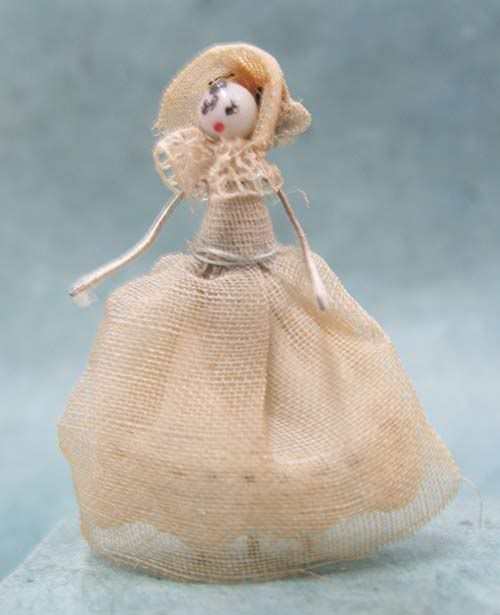
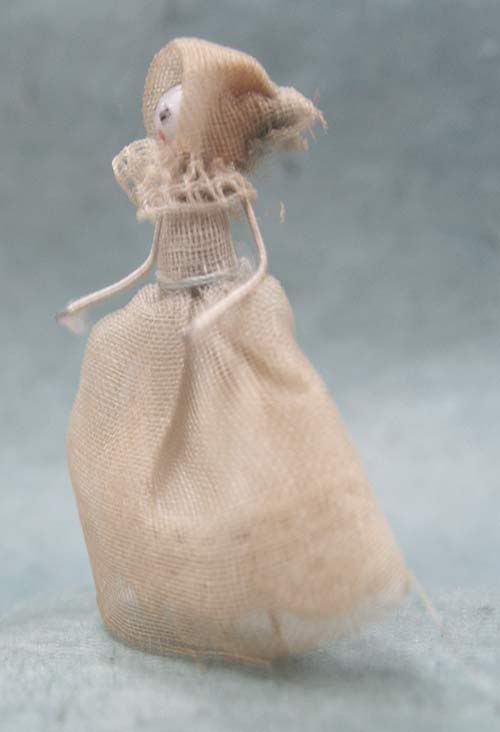
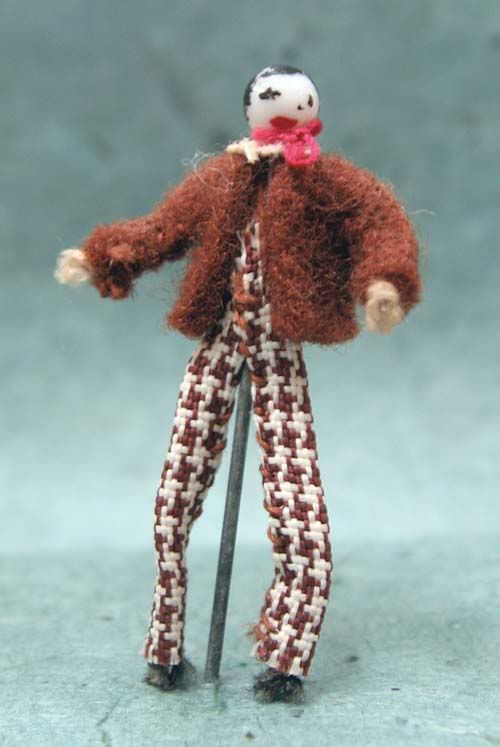
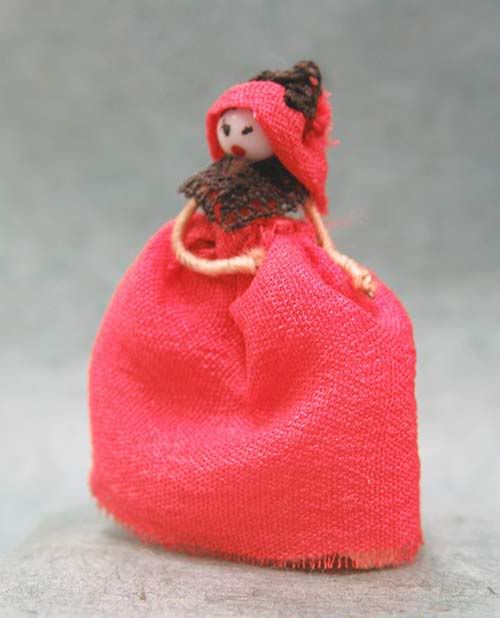
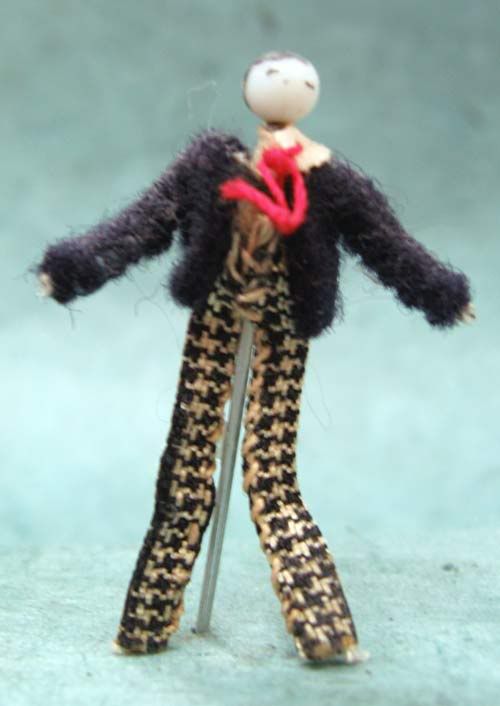
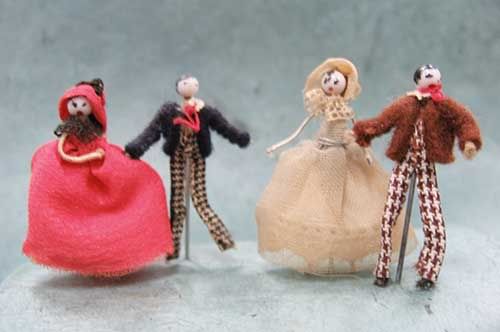
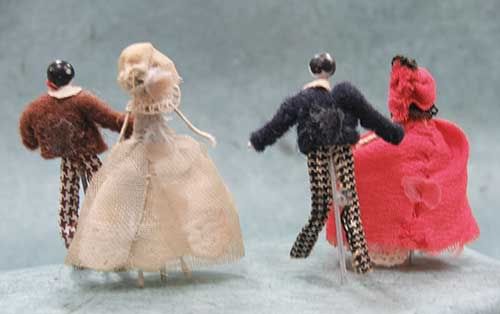
I got these dolls from a button seller at a flea market. I haven't been able to find any information on this type of doll in either doll collecting books or internet searches.
The dolls are built on ball-head pins. I think they are glass, but it is hard to do the "cheek test" for glass with them because I don't want to risk damaging the delicate painting or mussing the clothing. (You know the "cheek test", right? If you put an object that is glass, stone, or shell up to your cheek, it feels cold. Plastic will feel more like room temperature.)
The heads are the heads of the pins, arms and legs are thin coated wire, and the tiny clothing seams are hand sewn using fabrics that appear to be cottons, including voiles, and wools or felt. There is a little circle of glue on the back of each one. They stand by pushing the end of the pins into a softish base. The dolls are quite detailed for such tiny objects.
If anyone has any information on these, I would love to know more about them.
 Oona Ellibeans, a little whimsical mohair doll is now available in my Etsy Shop. You can see her here.


 Teddy w.i.p. - in baggie